
Initially I published my Blazor proof-of-concept projects to Azure , and that is fairly straightforward to setup in Visual Studio ( after initial fairly complicated Azure site setup ). But I decided to use Linux as publish target due to two reasons:
- to reuse same DigitalOcean droplet used for this WordPress site
- to have sites under my gmnenad.com domain, at reasonable price
Azure allows using your domain instead of appName.azurewebsites.net , but if you want also SSL on those custom domains ( which you must have in order to install PWA apps, like https://orao.gmnenad.com ), then Azure require moving to at least B1 tier – which is both more expensive ( over $50/month , compared to $0 for F1 or under $10/month for D1 ) and with worse performance ( just 1 CPU, compared to multiple CPUs on shared F1/D1 plans ).
But while reasons for publishing dotnet apps on Linux hosts instead of Azure will be different and subjective for most people, problem remains same :
How to publish dotnet core app from Visual Studio to your Linux host in the most efficient way ?
Visual Studio Publish options
While manual publishing of files to any host is always possible, what I needed is “one-click” publish integrated in standard Visual Studio publish process ( right-click VS project, ‘publish’ ), and currently supported options are:
- Azure
- Docker Container Registry
- Folder
- FTP/FTPS Server
- Web Server (IIS)
Obviously, for publishing directly to Linux host in order to be served with same web server ( Apache or Nginx ) as WordPress site, I had to ignore Azure and IIS, and even Docker options. Logical choice was therefore FTP/FTPS Server. But …
FTP/FTPS Server was bad option
FTP was not installed by default on Linux droplets that I used, and furthermore I consider simple FTP too insecure so I installed FTPS , which ( in short version ) included :
- installing vsftpd
- creating ftpuser and linking his /home/ftpuser/ftp/www to /var/www
- mount has to be used ( add to /etc/fstab) , since FTPS do not work with symlinks
- create openssl certificate for vsftpd.pem
- significantly change default vsftpd.conf ( ssl options, chroot, userlist, passive…)
- allow at firewall (ufw) FTP direct and passive ports (20,21,11000-12000)
- in Visual Studio, add FTP Publish Profile ( to /ftp/www/appName )
This “almost” works and allows standard “one-click” publish from Visual Studio , but has significant drawbacks:
- complicated to setup
- security implications ( another user, more open ports …)
- Visual Studio report 426 error for every copied file, and report ‘Failed Publish’ at end
- slow transfer ( maybe partially due to all those reported errors )
- no automatic restart of dotnet service on Linux
Reason why I mentioned “almost work” even with VS reporting failure is because all files end up transferred to Linux – that reported error is difference in how Windows and vsftpd think they should do FTPS : vsftpd expect other side to confirm ( with code 3 ) when it ends SSL session for one uploaded file, and when windows do not send that code, vsftpd sends 426 error back. Note that it is not windows vs Linux issue, since I tested curl in Linux, and it has same problem with vsftpd.
But while I could ignore error(s) reported by VS, main issue was that after FTPS publish I still had to manually SSH to Linux box to restart service for that dotnet app before change is visible in browser.
End result is that using FTPS was not a good option, which is also reason why I didn’t give details here about specific steps listed above . Instead, I moved to right option:
Folder publish is right option
Of course, folder publish on its own will only publish locally, so it had to go in tandem with some app that support file transfer. Initially I tried FileZilla but it does not have scripting support, so much better option was WinSCP – it does support scripts, and is very good choice even for other file operations between windows and Linux ( unrelated to publish ).
Short version of what is needed with this approach:
- install WinSCP and make it work with your Linux box using SSH keys as wwwuser
- create Visual Studio Folder Publish Profile
- create WinSCP script and modify FolderPublish profile to call that script
First step is standard one and not related specifically to Visual Studio. While it is mostly straightforward, here is detailed description of Linux steps to create wwwuser, pair of SSH keys, and allow that user to SSH using those keys . It was done on Ubuntu 18.04 (Bionic).
# assume those commands are run as root in terminal

# add new wwwuser ( in www-data Apache group, optional ) and set his password
adduser --ingroup www-data wwwuser
chpasswd wwwuser:*somepassword*

# switch to wwwuser, so keygen generate folder in his home
su - wwwuser
# create new SSH pair of keys in /home/wwwuser/.ssh folder
ssh-keygen
# insert public key to allow wwwuser to SSH with its private key
cat /home/wwwuser/.ssh/id_rsa.pub >> /home/wwwuser/.ssh/authorized_keys
# set ReadOnly to authorized_keys
chmod 644 /home/wwwuser/.ssh/authorized_keys

# MOVE KEYS FROM /home/wwwuser/.ssh , leave only authorized_keys
Above should allow to connect from WinSCP to Linux box using wwwuser. Those keys should be moved from Linux box – they are not needed there anymore, and private key (id_rsa) will be needed on Windows box for WinSCP. To test it: install WinSCP, open “New Session” , enter your server IP or domain, then press “Advanced” button and enter path to private key in SSH/Authentication section, as shown below:
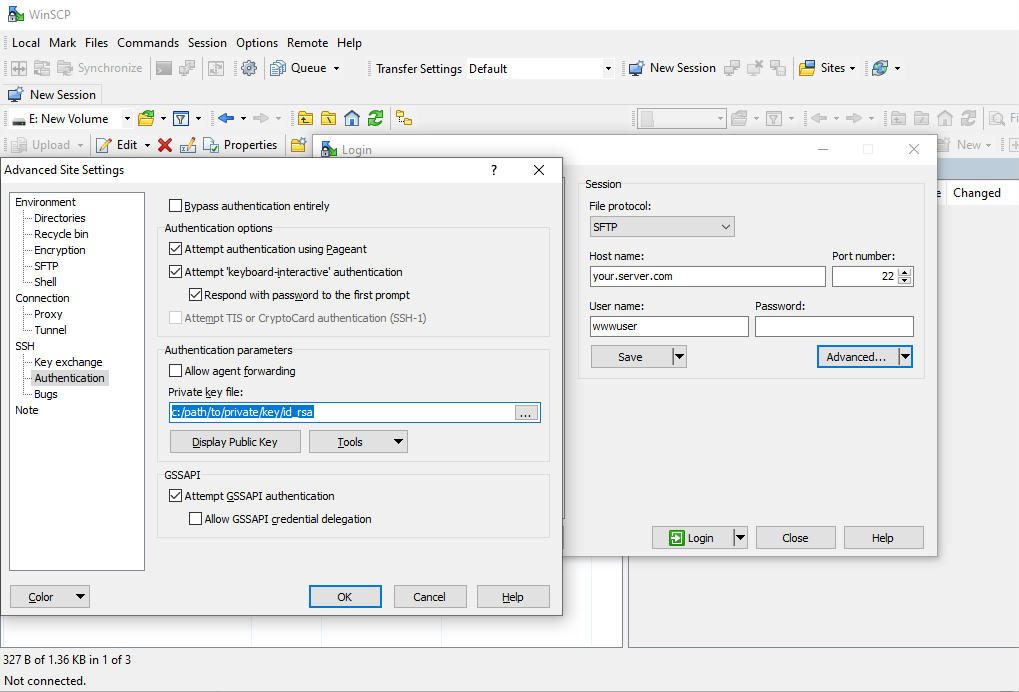
Allow WinSCP to automatically convert that private key from Linux format to its own format and save it as PuTTy *.ppk file in same folder. It should be enough for “Login” to work – after which you can save it for further use.
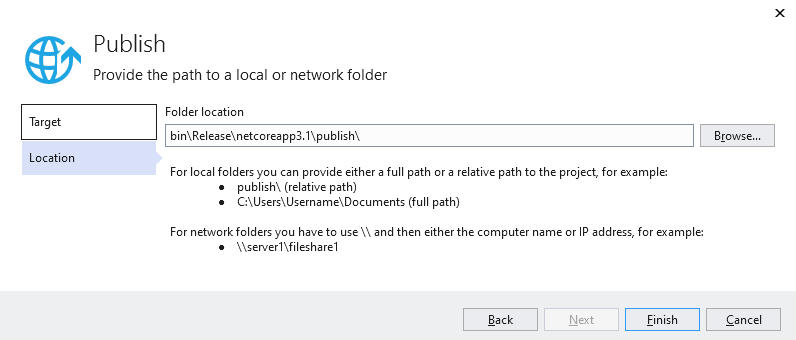
Second step is also standard one, not related to Linux – creating Visual Studio “Folder” publish profile.
Right click on project in Visual Studio, select “Publish” and then “New” if this is not first publish profile. Select “Folder” option, and after Next, leave options as default ( it offers location as “bin\Release\netcoreapp3.1\publish\” ) and just Finish creation. You can select “Edit” to change few options that were not available at creation step, but I tend to leave those as defaults too. This created new “FolderProfile.pubxml” in VS project under Properties/PublishProfiles .
To test , just right-click on VS project, select Publish and click “Publish” button – it should build your dotnet core app, and store it in “publish” folder from above.
Third step is where we integrate publish process with WinSCP, to automatically transfer published files to Linux.
It had two challenges:
- make WinSCP script to non-interactively copy files AND restart app service
- find correct place in VS publish process ( AfterTargets=”???” )
While previous two steps are agnostic toward type and location of actual dotnet app on Linux box, in this step we need to know that for script . In my case, I had following assumptions :
- app type: dotnet app hosted by Kestrel ( which was set as Linux service systemctl start appName )
- app location: /var/www/appName
- name of systemctl service is same as name of folder under /var/www : “appName”
- Linux script “restart_app.sh” was copied to /var/linuxVM
Location is usual one for web apps, and hosting dotnet app as systemctl service which runs Kestrel local web server with Apache/Nginx proxy in front is standard “type” of hosting both for Nginx or Apache web servers .
For WinSCP script, I created file “publishLinux.sh” in VS project root:
# open sftp session with wwwuser SSH key
open sftp://wwwuser@yourDomain.com/ -hostkey="ssh-ed25519..yourHostKey=" -privatekey="C:\path\to\private\key\user.ppk"

# create /www/appName folder ( but ignore error if already exists , with batch continue )
cd "/var/www"
option batch continue
mkdir "%2%"
option batch off

# go to appName folder and delete all old files. CD should throw error if folder does not exist
cd "%2%"
rm *.*

# on Windows, go to publish folder, and copy all from it to www/appName on Linux
lcd "%1%"
put *

# restart app service on Linux
call sudo /var/linuxVM/restart_app.sh "%2%"

# finish script with OK
exit
This script uses two parameters:
- %1% : first parameter is location of published files on Visual Studio machine
- %2%: second parameter is name of my app ( one word )
For script to work, you need to copy previously defined private SSH key to VisualStudio machine. If you manually opened WinSCP section as mentioned at end of first step, easiest way to get those values is to select any file on left side panel in WinSCP ( on Windows side ) and click “Upload” button. That will open Upload Dialog, where you should expand “Transfer Settings” combo box/button and select “Generate Code…“. That will show commands in “Script File” format, and you only need to copy first ‘open sftp:…” line ( which has correct host key and path to private key ) over to above script.
For restarting our Linux app after publish is done, WinSCP script relies on “restart_app.sh” bash script previously copied to /var/linuxVM folder :
#!/usr/bin/env bash
if [ ! -z "$1" ]; then
	# restart app service
	# instead of systemctl restart, since this will start even if it was stopped before
	sudo systemctl stop "$1" 2>null
	sudo systemctl start "$1" 2>null
	# reload proxy server too, may be needed by some indexed apps
	sudo systemctl reload apache2 2>null
fi
This restart_app.sh script was made with few assumptions:
- we use Apache as proxy server. Alternative last line for Nginx reload would be: sudo nginx -s reload
- we can have both “proxied” apps ( with Apache/Nginx “ProxyPass” to http://localhost:500x hosted by dotnet Kestrel ) and “indexed” apps ( where app index.html is served directly by Apache or Nginx, option for Blazor WASM apps )
- we added to /etc/sudoers : wwwuser ALL=NOPASSWD: /var/linuxVM/restart_app.sh *
If we only use “proxied” apps ( since Blazor WASM apps can also be used that way ) , we may not need to reload web server, so “reload Apache” would not be needed in “restart_app.sh”. Also, in order to allow ‘call sudo /var/linuxVM/restart_app.sh “%2%”‘ from WinSCP script without being asked for sudo password, we need to add our “restart_app.sh” script to “/etc/sudoers” file ( wildcard * at end will allow us to supply any parameter ). In theory it would be possible to call above commands directly from “publishLinux.sh” WinSCP script using call , and skip “restart_app.sh” – but it would require changes on all our Visual Studio installations if we change from Apache to Nginx and, more importantly, would require giving sudoers rights to wwwuser for unrestricted “systemctl *”, which is not good security practice. Using our “restart_app.sh” script also allows us to further check if supplied appName is one of ours (if we want more security).
Last part is calling “publishLinux.sh” from Visual Studio publish profile. To do that, open Properties / PublishProfiles / “FolderProfile.pubxml” in Visual Studio ( that is Properties folder under project root, not project options ) and add new <Target Name> section after last </PropertyGroup> , so that modified profile looks like this:
<?xml version="1.0" encoding="utf-8"?>
<!--
https://go.microsoft.com/fwlink/?LinkID=208121.
-->
<Project ToolsVersion="4.0" xmlns="http://schemas.microsoft.com/developer/msbuild/2003">
  <PropertyGroup>
    <DeleteExistingFiles>True</DeleteExistingFiles>
    <ExcludeApp_Data>False</ExcludeApp_Data>
    <LaunchSiteAfterPublish>True</LaunchSiteAfterPublish>
    <LastUsedBuildConfiguration>Release</LastUsedBuildConfiguration>
    <LastUsedPlatform>Any CPU</LastUsedPlatform>
    <PublishProvider>FileSystem</PublishProvider>
    <PublishUrl>bin\Release\netcoreapp3.1\publish\</PublishUrl>
    <WebPublishMethod>FileSystem</WebPublishMethod>
    <SiteUrlToLaunchAfterPublish />
    <TargetFramework>netcoreapp3.1</TargetFramework>
    <ProjectGuid>20245b63-e767-4b2a-8261-312f840e8213</ProjectGuid>
    <SelfContained>false</SelfContained>
  </PropertyGroup>

  <Target Name="LinuxPublish" AfterTargets="FileSystemPublish">
    <Message Importance="high" Text="*** Linux Publish             ... copying to LinuxVM ... " />
    <Exec Command="call "C:\Program Files (x86)\WinSCP\WinSCP.exe" /ini=nul /script=publishLinux.sh /parameter // "$(PublishUrl)" appName " />
  </Target>

</Project>
As mentioned above, finding correct place in VS publish process to insert our call is important. Here I had to do few trials and errors until I found AfterTargets=”FileSystemPublish” to be suitable ( called after publish folder is complete, and called regardless if rebuild was done or not ). Since this may change in the future , if Microsoft change publish process order, one way to find best AfterTarget is to set VS [ Tools-> Options-> Projects and Solutions-> Build and Run-> MSBuild project build output verbosity ] option from default “Minimal” to “Diagnostic” , then run publish and find in output what was last ‘Done building target “XYZ”‘ or similar message mentioning completion of some target, then use that last mentioned target name.
Only thing that need change in above FolderProfile.pubxml is ‘appName’ at the end of exec call ( line #23 ), which will define both folder on Linux where to copy and Linux service to restart. Other parameter ( publish folder location ) is automatically set by $(PublishUrl). In case that publish is failing, you can add “/log=WinSCP.log” before “/script=” in line #23 , as debug option.
That means each dotnet project will have its own FolderProfile.pubxml ( with its own publish folder and appName ), but they all can call same publishLinux.sh .
Good thing about this approach is that publish process will wait until file transfer is done, and correctly report success ( or failure if something was not copied ), with output similar to:
...
*** Linux Publish             ... copying to LinuxVM ...
call "C:\Program Files (x86)\WinSCP\WinSCP.exe" /ini=nul /script=publishLinux.sh /parameter // "bin\Release\netcoreapp3.1\publish\" appName
Web App was published successfully file:///E:/sourcePath/bin/Release/netcoreapp3.1/publish/

========== Build: 1 succeeded, 0 failed, 0 up-to-date, 0 skipped ==========
========== Publish: 1 succeeded, 0 failed, 0 skipped ==========
Benefits of this Folder option over FTPS option :
- easier to setup
- no additional services and open ports on Linux
- Visual Studio correctly report success or error
- faster transfer
- automatic restart of dotnet service on Linux
End result is real “one-click” publish of dotnet app from Visual Studio to Linux host.